Imagine sinking your teeth into tender, succulent ribs that practically slide off the bone, coated in a sweet, smoky, and intensely flavorful glaze. Now imagine achieving this barbecue perfection not on a grill or smoker, but right in your own oven, with surprisingly little fuss and even less cleanup. Welcome to the world of foil-wrapped oven ribs – a culinary revelation that satisfies even the most ardent barbecue purists.
For too long, baby back ribs in the oven have been an underrated secret, often overshadowed by their grilled or smoked counterparts. But what if we told you that the oven, with a simple foil-wrapping technique, could deliver an unparalleled tenderness, a depth of flavor, and an ease of preparation that makes homemade barbecue accessible any day of the year? Whether you're battling harsh winter weather, lack outdoor grilling space, or simply want a foolproof method for crowd-pleasing ribs, this approach is your new best friend. Say goodbye to endless scrubbing of grill grates and hello to fall-off-the-bone deliciousness with minimal effort.
The Undeniable Magic of Foil-Wrapped Oven Ribs
Skepticism about cooking barbecue indoors is understandable. Grilling and smoking evoke images of summer days and smoky aromas. However, don't let tradition blind you to innovation. Cooking baby back ribs in the oven, especially when tightly sealed in foil, creates a unique environment that rivals traditional methods in tenderness and moisture. The foil acts like a miniature braising chamber, trapping all the aromatic steam and savory liquids around the meat. This gentle, moist heat slowly breaks down the tough connective tissues in the ribs, transforming them into that coveted, melt-in-your-mouth texture that defines truly great ribs. This method ensures that every inch of the rib slab is consistently cooked and infused with flavor, from edge to edge.
Beyond the tenderizing power, the foil-wrap brings another invaluable benefit: unparalleled ease of cleanup. All the delicious juices, rendered fat, and caramelizing sugars remain contained within the packet, preventing them from baking onto your sheet pan. Once the ribs are done, you simply discard the foil, leaving you with little more than a quick rinse for your baking sheet. Who has time for mountains of dishes when you’ve got glorious ribs to devour?
Crafting Your Sweet & Smoky Rib Masterpiece
The journey to perfect oven-baked baby back ribs begins with quality ingredients and a simple, yet potent, flavor profile. Our recipe marries sweet, smoky, savory, and tangy notes, ensuring a truly unforgettable experience. For more insights on achieving that perfect texture, you might find this article helpful: How to Make Fall-Off-The-Bone Baby Back Ribs in Your Oven.
Gather Your Essentials:
- For the Ribs:
- 2 slabs baby back ribs, about 1-1.5 pounds each (look for good marbling and consistent thickness)
- For the Dry Rub:
- 1/4 cup light brown sugar (for sweetness and caramelization)
- 1 tablespoon chipotle chile powder (for smoky heat)
- 2 teaspoons kosher salt (the flavor enhancer)
- 1 teaspoon onion powder (aromatic depth)
- 1 teaspoon garlic powder (another layer of savory aroma)
- 1 teaspoon seafood seasoning (such as Old Bay, adding a unique, savory zest)
- 1/2 teaspoon freshly ground black pepper
- For the Braising Liquid & Glaze Base:
- 1 cup apple cider (adds fruitiness and acidity for tenderizing)
- 2 tablespoons apple cider vinegar (enhances acidity and tang)
- 1 tablespoon pure maple syrup (for deep, complex sweetness)
- 1 tablespoon Worcestershire sauce (umami bomb)
- 2 cloves garlic, minced (fresh aromatic punch)
The Easy Steps to Rib Glory:
- Prep the Ribs & Rub: Start by patting your ribs dry. This is crucial for the rub to adhere properly. If present, carefully remove the thin membrane from the bony side of each rib slab. This membrane can become tough and chewy when cooked, hindering that fall-off-the-bone texture. Combine all dry rub ingredients in a small bowl.
- Season & Chill: Place each slab of ribs on a large piece of heavy-duty aluminum foil, ensuring enough excess to create a tight seal later. Generously sprinkle the dry rub over both sides of the ribs, pressing it gently into the meat. Place the seasoned ribs, meat-side down and uncovered, in the refrigerator for at least 1 hour, or ideally 4 hours, to allow the flavors to penetrate. During this time, preheat your oven to a steady 300°F (150°C).
- The Braising Magic Begins: In another small bowl, whisk together the apple cider, apple cider vinegar, maple syrup, Worcestershire sauce, and minced garlic. Carefully pour half of this flavorful liquid over each slab of ribs on the foil. Now, expertly seal each slab in its own foil packet, crimping the edges tightly to prevent any leaks. This individual wrapping technique ensures maximum contact between the ribs and the braising liquid, intensifying the flavor and moisture.
- Slow Bake to Tenderness: Transfer the foil packets to a baking sheet and slide them into your preheated oven. Bake for approximately 2 to 2.5 hours, or until the meat is incredibly tender and visibly starts to pull away from the bones. The aroma filling your kitchen will be pure anticipation!
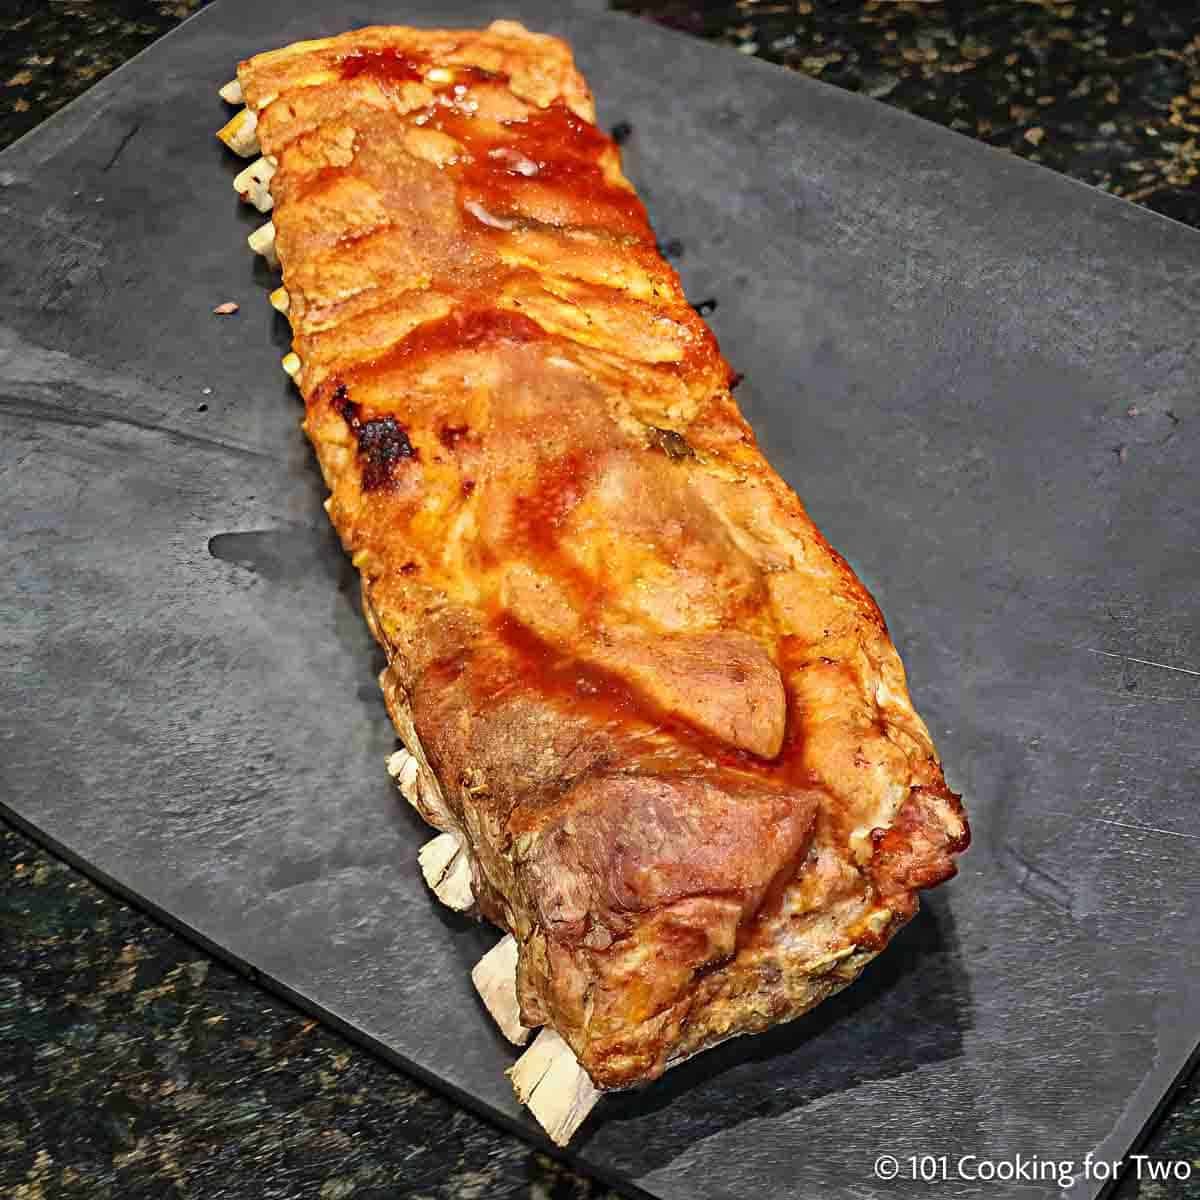
- Crafting the Irresistible Glaze: Once the ribs are tender, carefully remove the baking sheet from the oven. Open the foil packets (be cautious of the steam!) and gently pour the accumulated braising liquid from each into a small saucepan. Bring this liquid to a simmer over medium heat, allowing it to reduce and thicken into a glorious, syrupy glaze. This usually takes about 4-6 minutes, so keep a watchful eye. The concentrated flavors will be simply divine.
- The Grand Finale: Broil for Perfection: While your glaze reduces, line a clean baking sheet with fresh foil (for even easier cleanup!) and gently transfer the now-tender ribs to it. Position an oven rack on the top level and preheat your broiler. Using a pastry brush, generously coat the ribs with about half of your homemade glaze. Slide the ribs under the broiler for about 1 minute, just until the glaze begins to bubble and caramelize, developing a beautiful 'bark'. Remove, brush with the remaining glaze, and return to the broiler for another minute or so, or until slightly charred in spots. Watch closely to prevent burning!
- Serve & Enjoy: Remove the ribs from the oven, allow them to rest for a few minutes, then slice between the bones into individual or 2-rib portions. Serve immediately with your favorite sides and plenty of napkins!
Expert Tips for Ultimate Oven Ribs
To truly elevate your oven-baked baby back ribs, consider these additional insights:
- Rib Selection Matters: When choosing your ribs, look for slabs that are well-marbled with a good amount of meat over the bones. Avoid excessively fatty or lean racks. Smaller, consistently sized slabs (around 1-1.5 pounds) tend to cook more evenly.
- Don't Rush the Chill: While an hour in the fridge is good, letting the ribs sit with the dry rub for several hours or even overnight (uncovered) allows the salt and spices to deeply penetrate and tenderize the meat, enhancing flavor significantly.
- The Power of Braising Liquid: The specific combination of apple cider, vinegar, maple syrup, and Worcestershire isn't arbitrary. The acidity tenderizes, the sugars caramelize, and the umami components add incredible depth. Feel free to experiment with other fruit juices (like pineapple) or a splash of bourbon for a different twist.
- Watch the Broiler: The broiler is incredibly powerful and can burn your beautifully glazed ribs in mere seconds. Stay glued to the oven during the final broiling step. You’re looking for a beautiful char and caramelization, not a blackened crisp.
- Year-Round Enjoyment: This recipe truly shines in its versatility. You don't need a special occasion or perfect weather to enjoy fantastic barbecue. For more ideas on how to make ribs a year-round staple, check out: Skip the Grill: Perfect Oven Baked Baby Back Ribs Anytime.
The Grand Finale: Sweet, Smoky & So Easy
Embracing the oven for your baby back ribs in the oven is a game-changer. This foil-wrapped method proves that achieving profoundly tender, deeply flavorful, and irresistibly glazed ribs doesn't require a smoker, a grill, or even a sunny day. It’s a testament to simple techniques yielding extraordinary results, all while ensuring your kitchen cleanup is as effortless as possible. So, go ahead, preheat that oven, wrap those ribs, and prepare to delight your taste buds with a sweet, smoky, and utterly satisfying barbecue experience, anytime, anywhere.
